
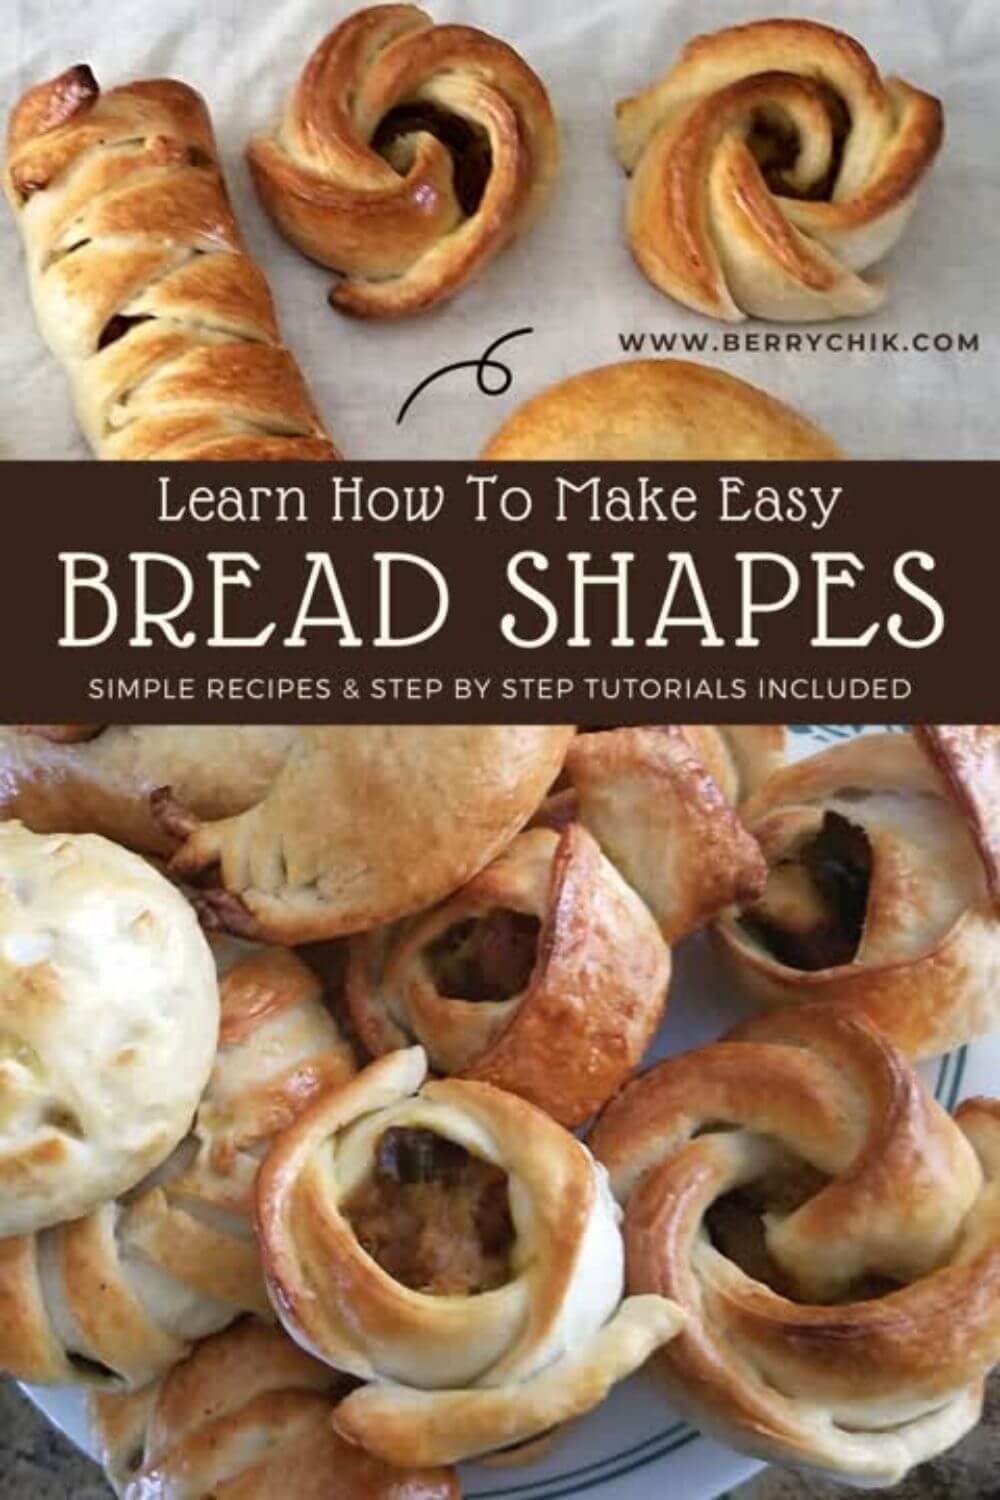
Step‑by‑Step Visual Guides of Different Bread Shapes for Beginners & Home Bakers.
Bread shaping isn’t just about aesthetics — it’s about turning a simple dough into something that sparks creativity, inspires joy, and adds personality to your baking. Whether you’re prepping for a party, packing a lunchbox with love, or just want to elevate your weekend baking game, learning different bread shapes makes every batch more exciting.
📣 Please note: Some links in this post are affiliate links. If you make a purchase through them, I may earn a small commission — at no extra cost to you. Think of it as a tiny thank‑you for sharing my favorite culinary finds. Your support truly means a lot.
And let’s be real — playing with dough is low‑key therapeutic. It’s like playdough for grown‑ups (and yes, kids too). You don’t need fancy tools or pro‑level skills — just your clean hands, a bit of curiosity, and this guide.
These 10 easy bread shapes are beginner‑friendly, visually satisfying, and totally addictive. Once you start, you’ll want to shape every batch of dough you make. So whether you’re diving in right now or saving this for your next baking session, this is your sign to get creative with your carbs.
First We’ll Knead A Dough
- Mix dry ingredients (all-purpose flours, sugar, instant yeast, and salt) in a bowl or stand mixer.
- Combine the butter and gradually add water while mixing until a soft, smooth dough forms.
- If sticky, add a sprinkle of flour. if dry, add water gradually.
- Cover and let rise for 15-25 minutes until doubled in size.
Filling Ideas (Optional but Delicious)
You can shape plain dough or stuff it with your favorite fillings:
- Savory: Fish sambal, chicken curry, beef mince, sautéed veggies, cheese, pizza fillings
- Sweet: Nutella, peanut butter + jam, marshmallows + chocolate, fruits
👉 Tip: Try my Fish Bun Recipe for a savory filling idea or go for my Hotdog Bun Recipe.
🌿 Just a friendly reminder: I’m a passionate foodie, not a certified nutrition or health professional. Everything shared here — recipes, tips, and food inspiration — is meant for enjoyment and creativity in your kitchen. For dietary guidance or health concerns, always consult a qualified professional.
10 Easy Bread Shapes to Try
From simple twists to fun flower buns, these bread shapes are beginner‑friendly, kid‑approved, and guaranteed to impress. Think of it as edible art — each shape adds personality to your baking and makes every batch feel special.
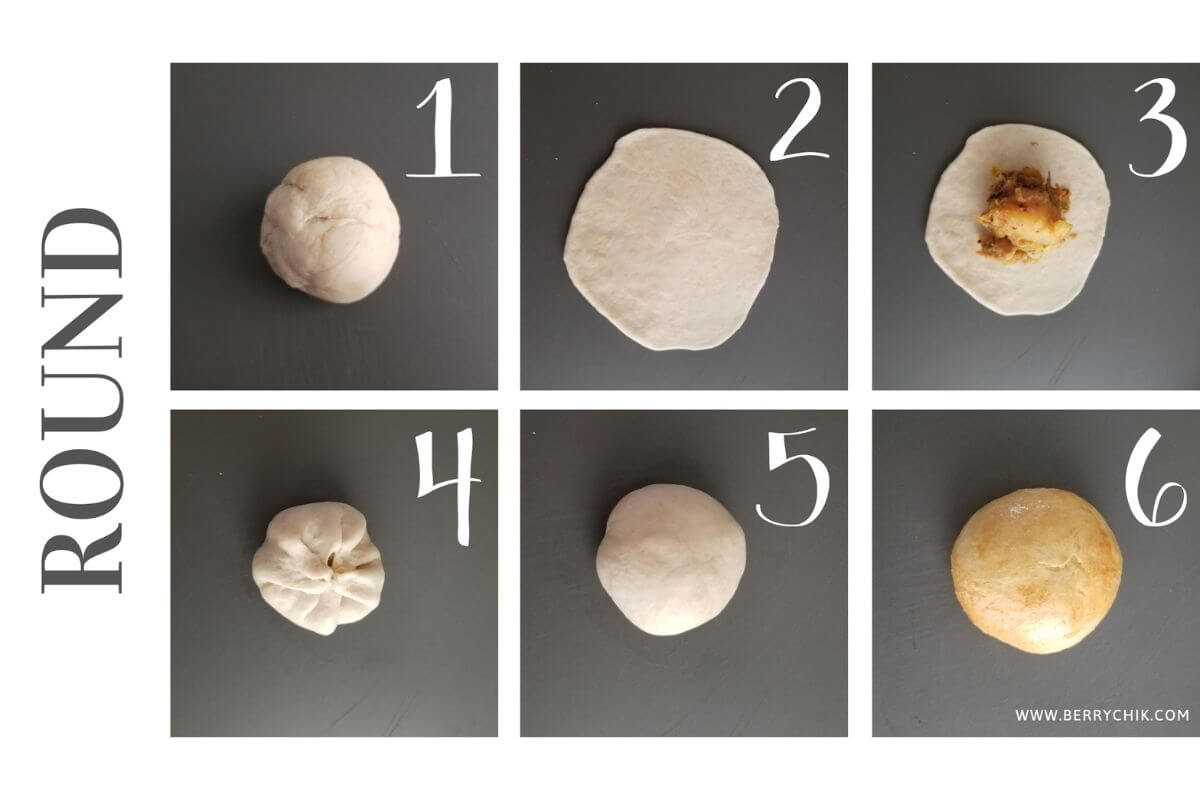
1. Round Bread Shape
- Start by taking a golf-ball size dough
- Use a dough roller or your fingers to stretch and flatten it to a circle
- Place a small portion of fillings in the center
- Bring all the edges, covering it over the fillings by pinching the dough sides together as shown in the picture
- Place the pinched side down to keep it sealed
- Finished look once baked

2. Triangle Bread Shape
- Take a golf-ball size dough, roll or stretch and flatten it to a circle
- Place the fillings in the center
- The edges will be folded from 3 sides. Start by folding 2 sides together. Pinch the dough upto halfway to keep it sealed
- Fold the last side of the dough and pinch the edges of the sides together to seal everything
- Tadaaa! you made a triangle shape. Turn the folded side downward, then with your hands shape it into a triangle shape
- Final look after baking
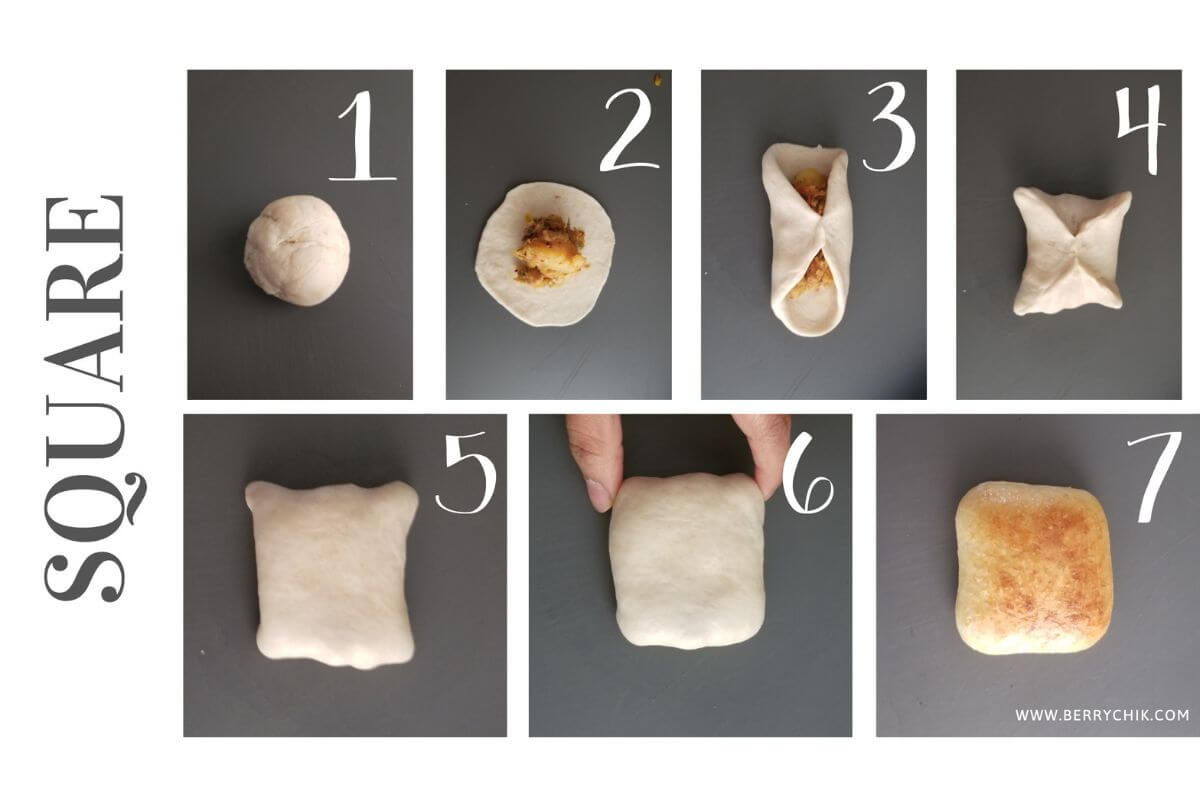
3. Square Bread Shape
- Take a golf-ball size dough, roll it big enough to place the filling
- Place a small portion of the filling in the center
- Take the two opposite sides together over the fillings and pinch the dough from the middle to keep it together
- Take the other two opposite sides of the dough as well and bring it together over the filling to seal the edges together
- Once every corner is sealed well, turn the folded side down when baking
- Form the dough to a square with your hands to adjust the shape
- Final look when baked
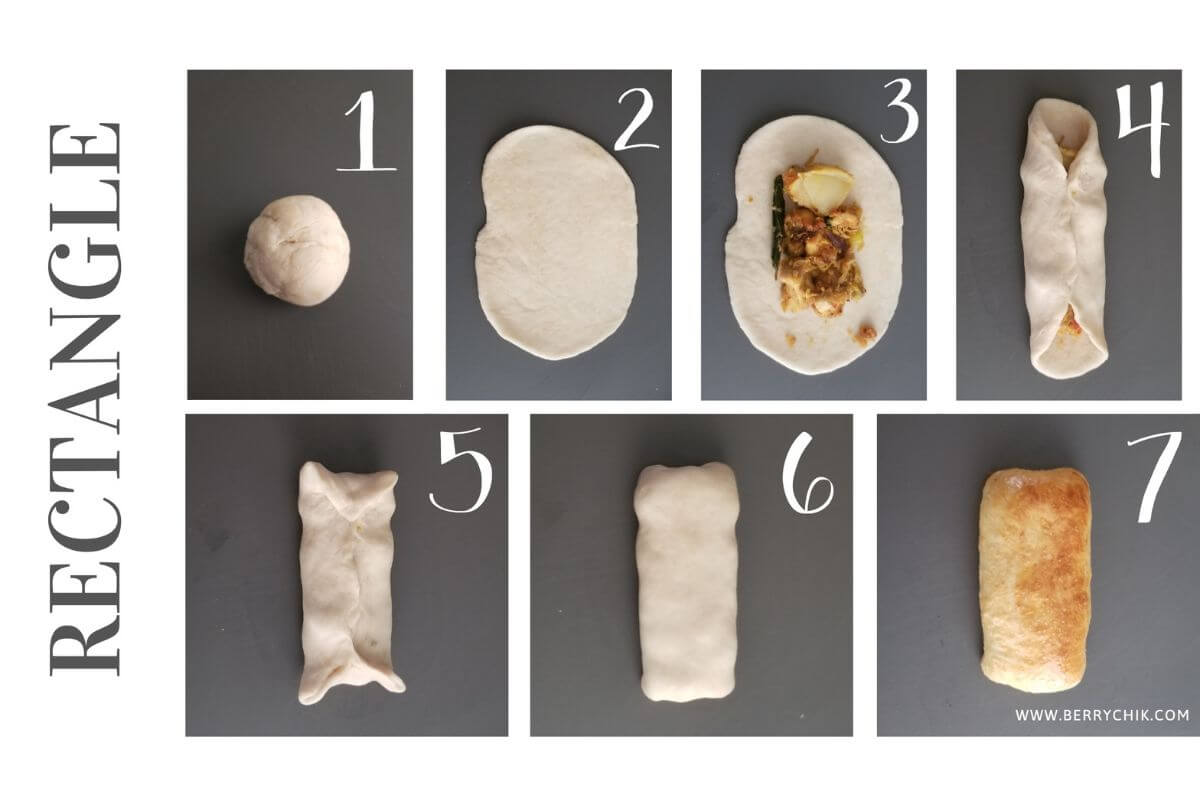
4. Rectangle Bread Shape
- Take a golf-ball size dough
- Roll it long and wide like an oval shape
- Place the fillings in a rectangle shape in the centre
- Take the two lengthy opposite sides of the dough, bring it over the fillings and pinch them together from the middle to keep them sealed
- Fold the top and bottom sides together meeting the fold we did in the step 4. Pinch the edges together to connect with the already folded side
- Turn the folded side down and shape it with your hands to look more like a rectangular shape
- Final look after baking

5. Shrimp Bread Shape
- Take a piece of dough
- Roll it wide and long like an oval shape
- Place the fillings straight in a line as shown
- Bring in the lengthy sides together folding over the fillings and connecting together like a wrap
- Make one end flat and make the other end pointy. Cut the flat end into two parts
- Carefully bend the shaped dough into a curve
- Use black pepper seed as eyes and use a scissor/knife to cut lines to the tail
- The end result after baking. (Keep in mind, when baking the dough, it will expand which can make the shape look alittle off….like my jumbo shrimp)
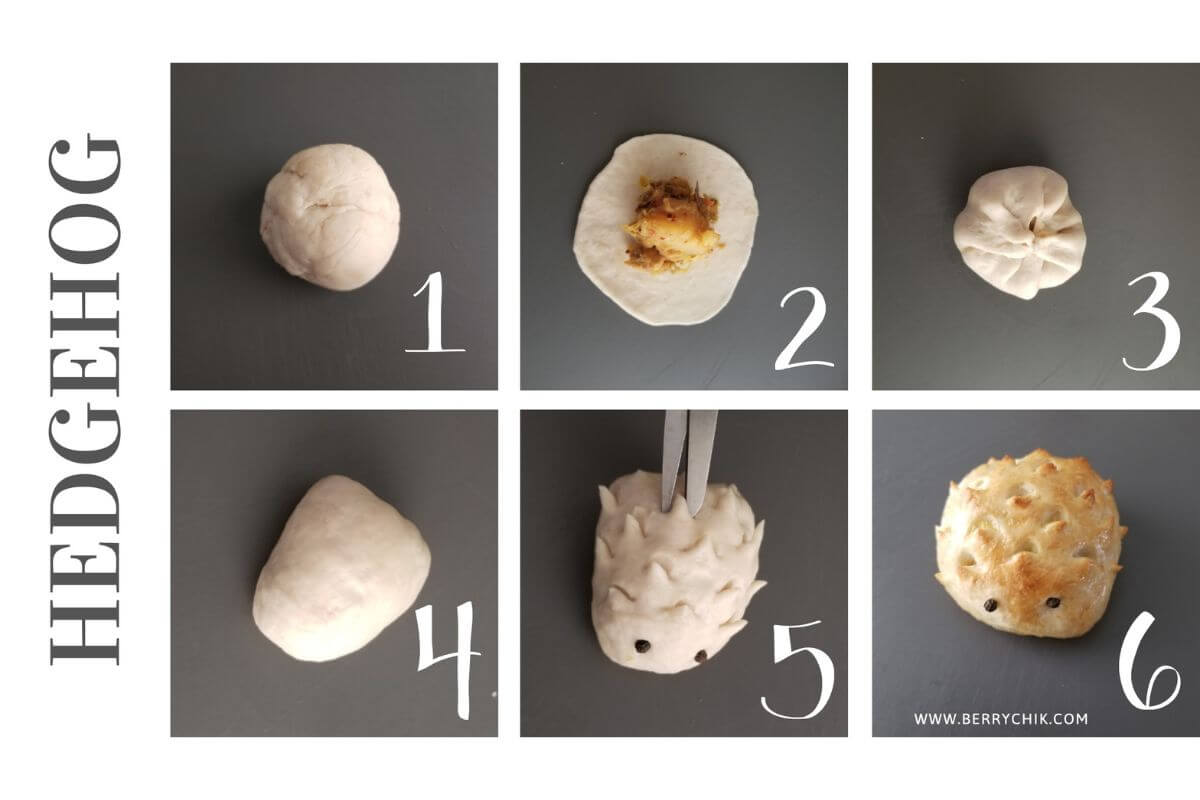
6. Hedgehog Bread Shape
- First, take a golf-ball size dough and roll it flat into a circle
- Place the fillings in the center
- Bring in all the edges together over the fillings. Pinch the dough together to keep it sealed
- Turn the folded side down. Use your hands to shape the dough into an almost triangle shape
- Use black pepper seed as eyes to the narrow corner of the shape. Then use scissors to make tiny cuts on the back of the hedgehog to look like its quills
- Final look after baking
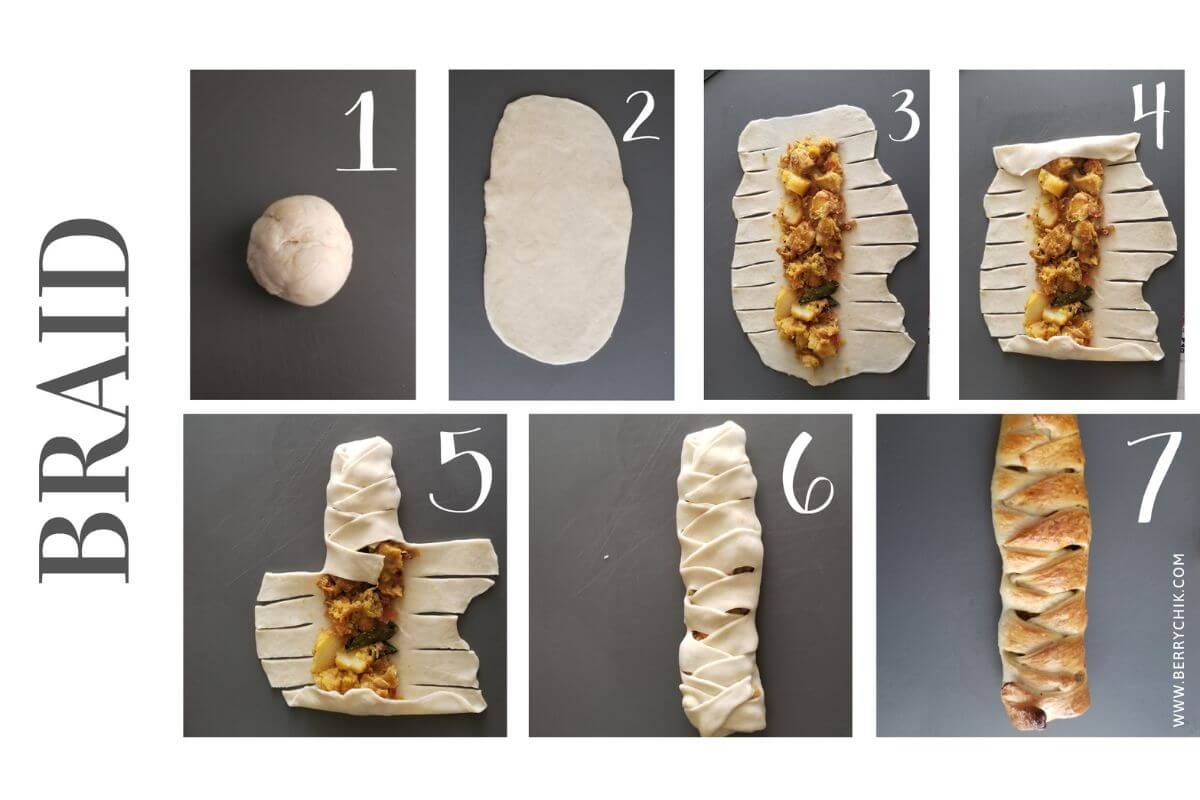
7. Braid Bread Shape
- Take a piece of dough
- Roll it flat, long and wide into an oval shape
- Place the fillings generously in a straight line in the middle of the dough. Then take a knife and make cuts as shown on the step 3 on either side of the dough
- Fold both the ends over the fillings to keep them from falling out
- Take each piece of cut dough on each side and fold it in an angle, one over the other one like on the step 5
- Continue to overlap each piece of the dough strings in an angle to look like a braid
- Viola! You braided the bread
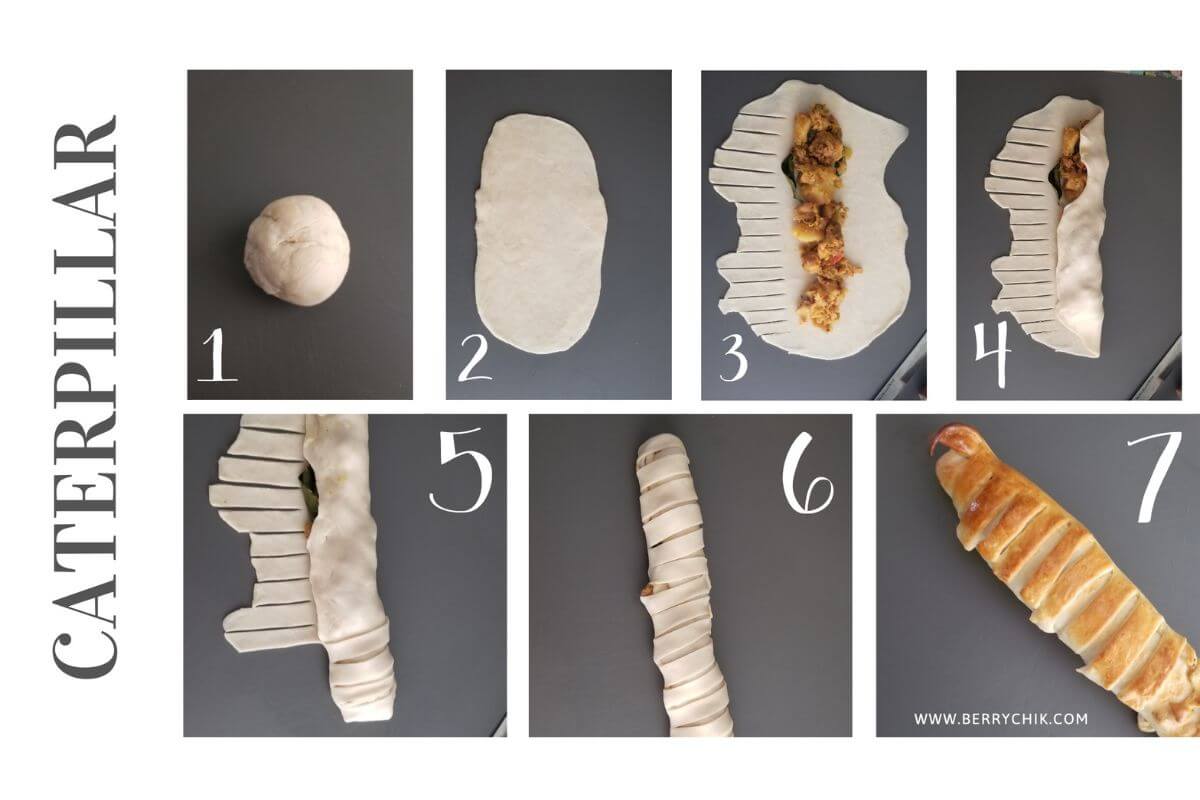
8. Caterpillar Bread Shape
- Take a piece of dough first
- Roll it flat, long and wide like an oval shape
- Place the fillings in a straight line on the center of the dough. Keep one side as is but cut the other side of the dough into strips using a knife as shown on step 3. You can cut it into thin or thick strips it’s up to you
- Fold the uncut side over covering the fillings
- Then take each cut strips and stretch it carefully over the already folded dough as shown on step 5
- Use black pepper seeds for the eyes. You may keep it straight as is or curve it to a C shape
- Final look after baking
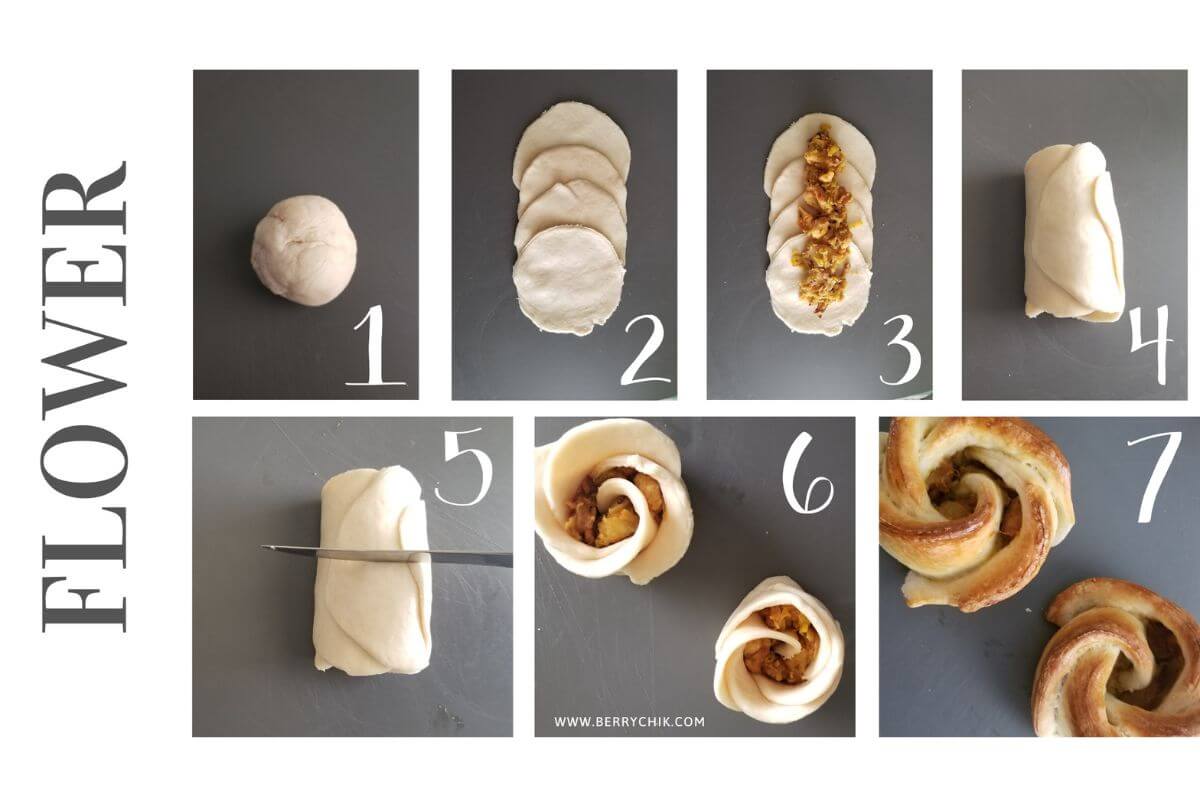
9. Flower Bread Shape
- Take a generous amount of dough and roll it large, thin, and flat
- Use a circle shape like a bowl or a cookie cutter to cut 3 to 4 circles. Place each circle lapping over the other one as shown in the step 2
- Place the fillings in the center, in a straight line across the 4 circle like shown on step 3
- Then roll the dough along with the fillings all the way into a wrap
- Use a knife to cut in half, turning it to two pieces like shown on step 5
- Turn the cut edge downward. Make the pedals a little more open if needed adjusting.
- Viola! You got 2 flower shaped bread
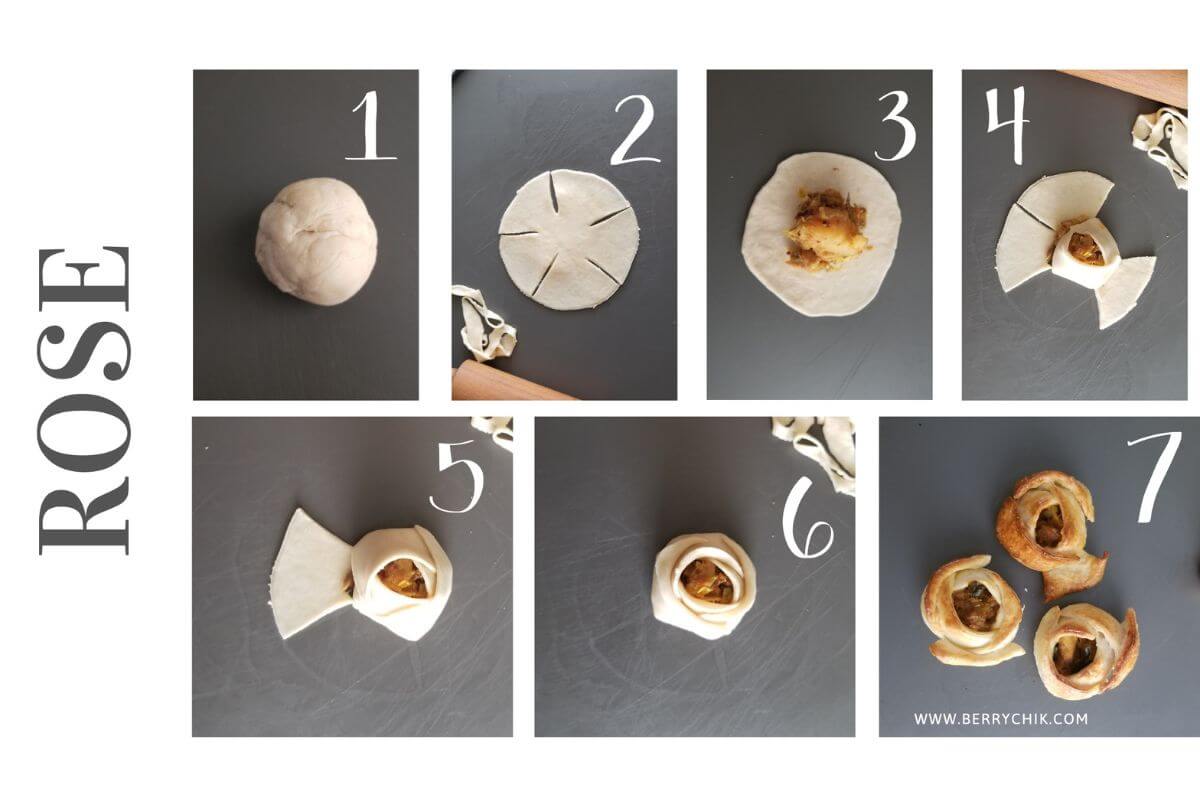
10. Rose Bread Shape
- Take a golf-ball size dough
- Roll it thin and flat. Use a round shape bowl or a circle cookie cutter to cut a perfect circle. Then make 5 cuts like shown in the step 2 of the images. Keep in mind to leave the middle uncut
- Place a small portion of filling in the middle
- Then fold one side cut dough over the filling leaving the top open. Next, take the opposite side of the dough piece and cover the other side
- Continue to fold each side as the petals covering the fillings from the sides and leaving the top open
- When all the sides are sealed well. From the top, open up the petals slightly to make it look more like a rose
- Final look. (My petals started to open up more as it baked)
Kid‑Friendly Baking Fun
Bread shaping doubles as a fun family activity. Get your kids involved — let them roll, pinch, and twist the dough. It’s messy, creative, and makes memories worth capturing. Plus, shaped breads are perfect for lunchboxes, parties, and even gifting.
Time to Bake It
Once all the shapes are done. Place them in the baking tray and gently cover on top with a clean cloth and let it sit for another 10-15 minutes. This step is totally optional but highly recommended. By giving it extra time to sit, the shaped dough has another chance to expand giving it a nice fluffy smooth final look.
When you are ready to bake, preheat the oven to 375’F. Use a beaten egg or warm milk to brush over the shaped dough before baking.
Bake it for about 25- 30 minutes or until the top is turned to a golden color.
🍽️ Craving more? From vegan‑friendly dishes, meat‑lovers favorites, to soul-food from the island, there’s a burst of flavor waiting in every recipe. Cook to satisfy your cravings — one delicious bite at a time.
🎯 Let’s be real: Deciding what to cook or even what groceries to buy can feel overwhelming on a chaotic day. Browse our curated collection of meal planners and kitchen resources to stay organized, simplify your day, and make cooking feel effortless. Grab your copy today and make life easier.
Dough Recipe
Ingredients
Method
- Mix dry ingredients in a bowl or stand mixer.
- Slowly add water while mixing until a soft, smooth dough forms.
- If sticky, add a sprinkle of flour. If dry, add water gradually.
- Cover and let rise for 15-25 minutes until doubled in size.
🔥Show Off Your Plating by tagging @iberrychik on Instagram or Pinterest — I love seeing your cooking. Let’s savor this food journey together.
📬 Subscribe to not miss a thing on Berrychik. You’ll get sneak peeks, free perks, and mouth‑watering recipes delivered straight to your inbox. Psst… when you join for FREE, you’ll also receive a FREE 7‑Day Meal Planner. Check out our shelf to view the collection.
Final Thoughts
Bread shapes aren’t just cute — they’re practical. They make everyday bread more exciting, help portion control, and add a wow‑factor to your table. Whether you’re baking for family, friends, or yourself, these shapes will make you fall in love with dough all over again.
Save these 10 Easy Bread Shapes to your baking boards for inspiration. Perfect for beginners, home bakers, and anyone who wants to add creativity to their bread‑making routine.
More Recipes…
- Fermented Rice (Pazhaya Soru / Diya Batha) – Gut‑Healthy Sri Lankan Breakfast You Can Make Overnight
- Sri Lankan Muslim‑Style Pulled Beef Fry | Spicy Iratchi Sambal Inspired by Maasi Sambal
- Set Up Your Food Blog: Your First Steps Inside WordPress
- Sri Lankan Egg Rice – Quick Tempered Rice with Eggs (Leftover Rice Recipe)
- Instant Pot Biryani That Tastes Even Better the Next Day
