In the last post in this Set Up Your Food Blog series, you made three big decisions — the kind every new food‑blogger‑in‑the‑making has to make:
- You chose the kind of food you want to be known for (your niche)
- You picked the perfect name for your place (your domain)
- You chose where your blog will live (your hosting)
Now that the “building” is yours, it’s time to step inside and get familiar with the space — your WordPress dashboard. This is where your recipes, stories, and creativity will come to life.
Think of this stage like walking into an empty kitchen for the first time. The counters are clear. The shelves are bare. Everything is waiting for you to bring it to life.
And the best part? You don’t need tech skills for this part. Just curiosity, a few clicks, and the same passion you bring to your real kitchen.
Let’s get your space ready.
📣 Please note: Some links in this post are affiliate links. If you make a purchase through them, I may earn a small commission — at no extra cost to you. Think of it as a tiny thank‑you for sharing my favorite culinary finds. Your support truly means a lot.
Step 1: Sign Up with Bluehost (if you haven’t yet)
If you haven’t chosen hosting yet, this is your first step. Once you pick your plan, Bluehost walks you through a super simple setup. You’ll:
- Confirm your domain name
- Add your basic info
- Choose your hosting term (12 months is perfect for beginners)
- Skip the extras for now
- Enter payment details
💡 The basic plan is perfect to start with. It’s affordable, beginner‑friendly, and includes a free domain for your first year.
After checkout, Bluehost automatically guides you to install WordPress — no downloading, no coding, no stress.
Step 2: Install WordPress (It’s Literally One Click)
Think of WordPress as your kitchen equipment — the tools you’ll use to cook, plate, and serve your content.
Inside your Bluehost dashboard, you’ll see a button that says something like “Install WordPress.”
Click it. That’s it.
Once it’s installed, you’ll get a login link to your WordPress dashboard: yourdomain.com/wp-admin
Save it — this is your kitchen counter, where you’ll spend most of your time as a blogger.
💡 Forgot your login or got locked out of WP? You can always access WordPress through your Bluehost dashboard.
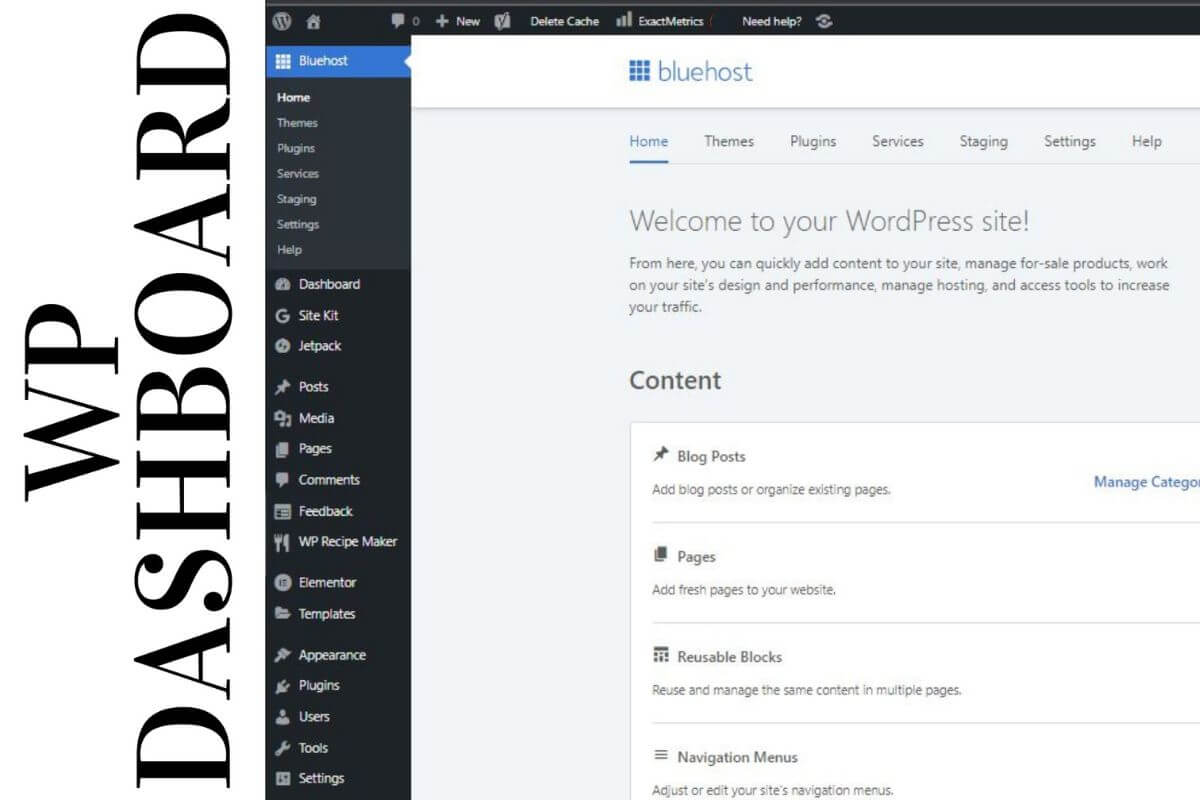
Step 3: Log Into Your WordPress Dashboard
This is where everything happens — your recipes, your photos, your pages, your design. It might look a little overwhelming at first, but so does any new kitchen, you’ll get comfortable faster than you think.
On the left‑hand side, you’ll see a menu. Here’s what the main sections mean in simple terms:
- Posts — where you write and manage your recipes and blog content
- Media — where your food photos and images are stored
- Pages — your About, Contact, Recipe Index, and other static pages
- Appearance — your blog’s “interior design” (theme, menus, widgets)
- Plugins — extra tools (like recipe cards, security, SEO, and more)
- Settings — your blog’s basic setup (site title, time zone, permalinks)
- Bluehost tab — hosting tools and performance options
💡 Click around. You won’t break anything. Exploring is the best way to learn your new space and feel at home inside WordPress.
💭 Should You Make Your Site Public Yet?
Short answer: not yet.
Right now, your blog is like a restaurant still under renovation.
Your hosting is set up.
WordPress is installed.
But your menu, pages, and categories aren’t ready for guests.
Bluehost automatically puts your site in “Coming Soon” mode — and that’s a good thing.
Use this time to:
- Choose and customize your theme
- Install essential plugins and set them up
- Create your About, Contact, and other essential pages
- Draft your first recipe post and upload a few photos
Once your blog feels like you, then it’s time to go live for public.
You’re In the Kitchen Now
Look at you — you’ve gone from dreaming to doing. Your food blog is no longer just an idea… it’s a space you’re building with intention, creativity, and heart.
WordPress + Bluehost gives you a clean, simple space to work in — and you’re learning it step by step, just like a new recipe.
What’s next?
You’ve already,
- Chosen your niche, domain, and hosting
- Logged into WordPress and explored your dashboard
👉 Next up: How to Choose a Theme That Matches Your Style
👉 Previous post: How to Choosing Your Niche, Domain, and Hosting
👉 Head to The Shelf to grab a DIY meal planner. The 7-Day mini edition is FREE, download it, print it, and stay organized in the kitchen, so you can spend more time blogging.
👉 But if you need help with a recipe, head over to our recipe collection. You’ll find recipes from vegan-friendly to meat-lovers favourites… and some island food that are finger-licking satisfying.

